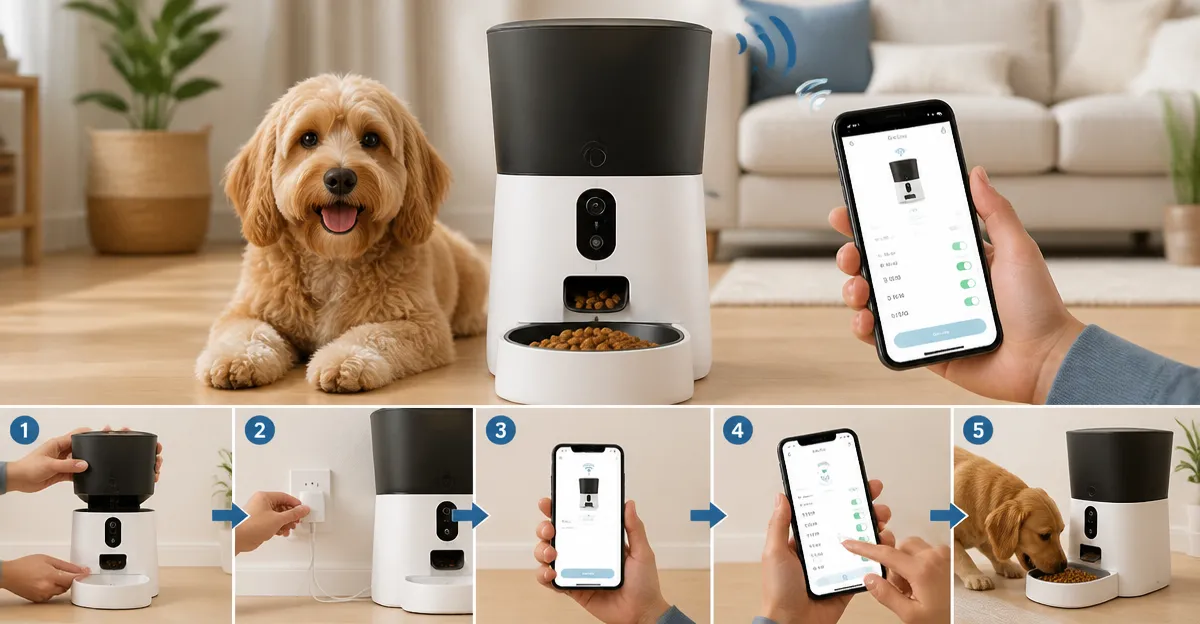
How to Set Up a Smart Pet Feeder: Step‑by‑Step Installation, Scheduling & Troubleshooting for Dogs & Cats
Introduction
One will discover how to install a smart pet feeder, configure feeding times, record personalized voice calls, and resolve common issues. The guide emphasizes reliable feeding, food freshness, and reduced owner anxiety when away from home. By following each step, one can ensure that cats and dogs receive appropriate nutrition on schedule. The information remains valuable even without purchasing any of the recommended devices.
What You’ll Need
- Smart pet feeder (see product recommendations below)
- Power source – wall outlet or batteries
- Stable Wi‑Fi connection (for Wi‑Fi enabled models)
- Measuring cup or kitchen scale for portion verification
- Screwdriver or small tool for optional assembly
- Cleaning cloth and mild detergent
Step 1: Unbox the Feeder and Choose a Placement
Begin by removing all components from the packaging and inspecting them for damage. Place the feeder on a flat, non‑slippery surface away from direct sunlight and drafts, as temperature fluctuations can affect kibble texture. For multi‑cat households, a location with enough clearance between bowls prevents competition during meals. The Andoll Home Automatic Cat Feeder is an excellent mechanical option because its compact design fits easily on countertops and its sealed lid protects food from moisture.
Key features of the Andoll Home feeder include a smooth food‑distribution system, a 10‑second voice recorder, and dual power options. It holds up to 4 L of dry food, supports up to eight meals per day, and carries a 4.5‑star rating from 2,936 reviewers. Priced at $30.99, it offers a budget‑friendly solution for owners who prefer a simple, reliable device without app integration.
Step 2: Connect Power and Verify Backup Options
Plug the feeder into a wall outlet using the supplied 5 V DC adapter, ensuring the cord is not stretched across high‑traffic areas. If the model includes battery backup, insert three alkaline D‑cell batteries (not provided) to guarantee operation during power outages. The Andoll Home feeder automatically switches to battery power when the mains supply is interrupted, maintaining feeding continuity.
For Wi‑Fi enabled feeders, such as the PETLIBRO WiFi Automatic Cat Feeder, an additional USB‑C power adapter is supplied. This model also accepts 2–3 D‑cell batteries, providing redundancy similar to the Andoll Home unit. The PETLIBRO WiFi feeder costs $75.99, carries a 4.2‑star rating from 10,697 reviews, and includes a built‑in desiccant bag to keep kibble crisp.
Step 3: Establish a Wi‑Fi Connection (If Applicable)
Download the PETLIBRO app from the iOS App Store or Google Play Store and create an account. Open the app, select “Add Device,” and follow the on‑screen prompts to connect the feeder to a 2.4 GHz Wi‑Fi network. The 5 GHz band is also supported, but the 2.4 GHz band typically offers greater range and wall penetration, which reduces the likelihood of disconnections.
During the pairing process, ensure the feeder is within one meter of the router to obtain a strong signal. Once connected, the app will display the current food level, battery status, and any error notifications. The PETLIBRO WiFi feeder provides real‑time alerts when the food tank is low, when a jam occurs, or when the battery requires replacement, enhancing owner confidence.
Step 4: Load Food and Secure Freshness
Open the feeder’s lid and pour dry kibble into the reservoir, ensuring the kibble size does not exceed the recommended maximum (approximately 0.5 inch for most models). For the PETLIBRO WiFi feeder, the built‑in desiccant bag and sealing strip create an airtight environment that prevents moisture absorption and mold growth. The Andoll Home feeder also includes a desiccant compartment for the same purpose.
After filling, close the lid firmly until the locking mechanism clicks. Verify that the food‑swinging device (Andoll Home) or patent rotor (PETLIBRO) operates smoothly by manually dispensing a small amount of kibble. This step confirms that the dispensing mechanism is free of obstructions before scheduling meals.
Step 5: Program the Feeding Schedule
Access the feeder’s control panel or the PETLIBRO app to set the desired number of meals per day. The Andoll Home feeder allows up to eight meals, while the PETLIBRO WiFi model supports up to ten meals with portion sizes adjustable in 1/12‑cup increments. For each meal, specify the exact time and portion amount, using a kitchen scale to verify that the selected portion matches the intended calorie intake.
When feeding multiple pets, consider the oneisall Dual‑Cat Feeder. This device offers two separate bowls spaced 16 inches apart, preventing food competition and ensuring each cat receives an equal portion. It holds 5 L (20 cups) of food, supports up to six meals per day, and records a 10‑second voice message for each feeding. Priced at $49.99 with a 4.6‑star rating from 4,085 reviews, it is ideal for households with two cats.
Step 6: Record a Personalized Voice Meal Call
Most smart feeders include a voice‑recording feature that plays a short message before dispensing food. This cue reinforces the feeding routine and can calm anxious pets when the owner is absent. To record, press the designated button on the feeder or use the app’s voice‑record function, speaking clearly for ten seconds. The Andoll Home feeder repeats the message three times, while the PETLIBRO WiFi feeder allows the owner to set the number of repetitions.
Testing the voice call after recording ensures the volume is appropriate for the pet’s hearing range. Adjust the recording level if the pet appears startled or indifferent. Consistent use of the voice call helps pets associate the sound with mealtime, reducing begging behavior.
Step 7: Perform a Test Run and Fine‑Tune Portions
Initiate a manual feeding cycle using the feeder’s button or the app’s “Feed Now” command. Observe the kibble flow, bowl tilt, and any residual food in the dispensing chamber. If the portion appears larger or smaller than intended, adjust the portion setting incrementally and repeat the test until the desired amount is achieved.
For owners who use the PETLIBRO 3L Automatic Cat Feeder, the infrared anti‑jam sensor will pause dispensing if an obstruction is detected, protecting both the device and the pet. This model costs $59.99, has a 4.2‑star rating from 11,694 reviews, and provides dual power via USB‑C and D‑cell batteries, offering flexibility during outages.
Tips & Pro Tips
- Place the feeder on a stable surface and secure it with anti‑slip pads to prevent tipping during vigorous eating.
- Use a kitchen scale to calibrate portion sizes; most feeders measure in teaspoons or 1/12‑cup increments.
- Replace the desiccant bag in PETLIBRO models every two weeks to maintain optimal food dryness.
- Schedule regular cleaning cycles: disassemble the food reservoir weekly, wash with mild detergent, and dry thoroughly before reassembly.
- When using battery backup, keep spare alkaline D‑cells on hand to avoid unexpected interruptions.
Troubleshooting
| Problem | Possible Cause | Solution |
|---|---|---|
| Feeder does not dispense food | Kibble jam or low battery | Check for blockage in the dispensing chute, clear any stuck kibble, and replace batteries or plug in the adapter. |
| Wi‑Fi disconnects frequently | Router too far or 5 GHz band used | Move feeder closer to router or switch to 2.4 GHz band; ensure firmware is up to date via the app. |
| Portion size inaccurate | Incorrect calibration or uneven kibble size | Measure a test portion with a scale, adjust the feeder’s portion setting, and use uniformly sized kibble. |
| Voice call not audible | Speaker volume low or recording too soft | Re‑record the message at a louder volume; verify speaker is not obstructed. |
| Food becomes stale | Desiccant missing or lid not sealed | Insert a fresh desiccant bag, ensure the twist‑lock lid is fully engaged, and store feeder in a cool, dry area. |
Conclusion
By following the outlined steps, one can install a smart pet feeder, configure precise feeding schedules, and maintain food freshness with confidence. The recommended devices address a range of needs, from basic mechanical reliability to advanced Wi‑Fi control and multi‑pet management. Implementing the tips and troubleshooting strategies will minimize disruptions and ensure pets receive consistent nutrition. With a properly set up feeder, owners gain peace of mind while enjoying greater flexibility in their daily routines.
Products Mentioned in This Guide
Frequently Asked Questions
How do I choose the best location for my smart pet feeder?
Place it on a flat, non‑slippery surface away from direct sunlight, drafts, and high traffic to keep food fresh and prevent tipping.
What are the essential steps to connect a Wi‑Fi enabled feeder?
Plug in the feeder, download the companion app, follow the in‑app prompts to select your Wi‑Fi network, and confirm connection via the feeder’s indicator light.
How can I ensure accurate portion sizes with a smart feeder?
Use the measuring cup or kitchen scale provided to calibrate the feeder’s portion settings in the app before each use.
What should I do if the feeder stops dispensing food?
Check power, verify Wi‑Fi connectivity, reset the device via the app or power cycle, and clean any jammed food trays.
Can I record a voice message for my pet, and how?
Yes—record a short greeting in the app’s voice‑call feature, then assign it to a feeding schedule so the feeder plays it at each meal.