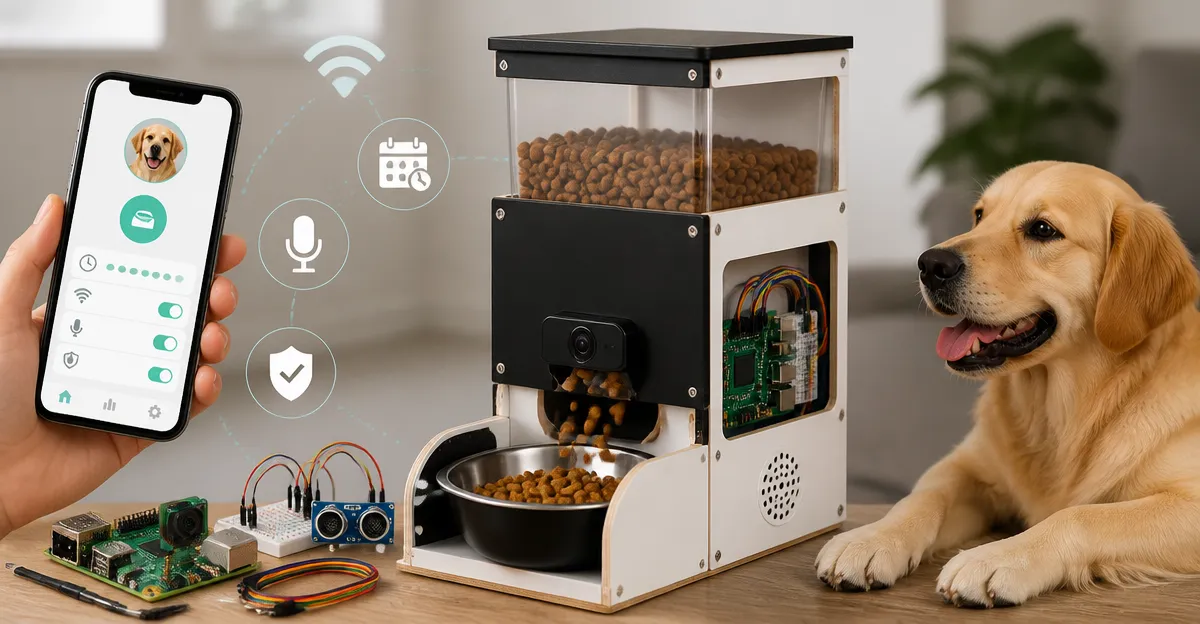
How to Build a DIY Raspberry Pi Smart Pet Feeder: Step‑By‑Step Guide for Wi‑Fi Scheduling & App Control
Introduction
In this guide, one will learn how to construct a custom smart pet feeder using a Raspberry Pi, open‑source software, and inexpensive hardware. The resulting device will allow Wi‑Fi scheduling, remote monitoring, and optional voice calls, providing the same convenience as commercial feeders while remaining fully customizable. By following each step, one can save money, gain technical skills, and ensure that the feeder meets the specific dietary needs of a cat or small dog.
What You’ll Need
- Raspberry Pi 4 (4 GB) with power supply
- Micro‑SD card (32 GB, Class 10)
- 5 V step‑per motor or servo for dispensing
- Food‑grade hopper or container (e.g., a 5‑L bin)
- Limit switch or infrared sensor for jam detection
- USB Wi‑Fi dongle (if Pi model lacks dual‑band)
- Jumper wires, breadboard, and soldering tools
- Optional enclosure for aesthetics
Step‑By‑Step Instructions
Step 1: Prepare the Raspberry Pi
Begin by flashing the latest Raspberry Pi OS onto the micro‑SD card using Raspberry Pi Imager. After installation, insert the card, connect the power supply, and boot the device. Configure the Wi‑Fi network via the desktop interface or raspi-config. Enable SSH and VNC if remote access is desired. This foundation provides a reliable computing platform for running the feeder software.
Step 2: Choose a Food Dispensing Mechanism
For precise portion control, a step‑per motor coupled with a gear‑driven auger works well. If a ready‑made hopper is preferred, the PETLIBRO 5L WiFi Cat Feeder demonstrates a proven design. It features a 5‑L capacity, low‑food sensor, and Wi‑Fi connectivity for up to 10 meals per day. Priced at $89.99 with a 4.1‑star rating, it illustrates how a sealed container and motorized dispenser can keep kibble fresh and prevent jams. One can replicate its twist‑lock lid and desiccant bag using off‑the‑shelf components, or repurpose the feeder’s hopper as the housing for the custom build.
Step 3: Assemble the Motor and Hopper
Mount the step‑per motor on a 3‑D‑printed bracket that aligns the motor shaft with the auger inside the hopper. Secure the hopper to the bracket using screws or zip ties. Connect the motor driver (e.g., ULN2003) to the Raspberry Pi GPIO pins. Verify that a single rotation moves approximately 1/12 cup of kibble, matching the portion size used by many commercial feeders.
Step 4: Install Sensors for Safety
Attach an infrared sensor at the food outlet to detect blockages. When the sensor detects an obstruction, the software will pause the motor and send a notification. This safety feature mirrors the “Smart Notifications and Indicators” found in the PETLIBRO 5L WiFi Cat Feeder, which alerts users when the food tank is empty or jammed.
Step 5: Set Up the Control Software
Install Node‑RED or Python Flask on the Pi to create a web dashboard. Use the gpiozero library to control the motor and read sensor inputs. Create REST endpoints for scheduling meals, adjusting portion sizes, and uploading voice messages. Store the schedule in a SQLite database so the feeder operates even when the internet connection is lost, addressing a common complaint about Wi‑Fi‑only feeders.
Step 6: Add Voice Meal Calls (Optional)
Record a 10‑second voice message on a computer and upload it to the Pi via the dashboard. The motor driver can trigger a small speaker to play the message before each dispense. Commercial feeders such as the PETLIBRO 5L WiFi Cat Feeder and the Voluas 4L Automatic Cat Feeder include this feature, but building it yourself allows unlimited customization of the audio file and volume.
Step 7: Integrate Mobile App Control
Develop a simple progressive web app (PWA) using HTML, CSS, and JavaScript that communicates with the Flask API. The app should display upcoming meals, battery status, and allow on‑the‑fly adjustments. Because the Pi hosts the API locally, the app works on any device without requiring a third‑party cloud service, thereby eliminating privacy concerns raised by some users of the PETLIBRO 3L Automatic Cat Feeder.
Step 8: Power Management and Backup
Connect the Pi to a UPS HAT or use a battery pack to maintain operation during outages. The IMIPAW Automatic Cat Feeder offers dual power supply (USB adapter and D‑cell batteries) at $29.99 with a 4.4‑star rating, showing the practicality of battery backup for pet feeders.
Step 9: Test and Calibrate
Run a series of test dispenses to verify that each portion matches the desired weight. Adjust the motor steps in the software until the output is within ±5 % of the target. Record the results in a log file for future reference. This calibration step ensures consistent nutrition and prevents over‑feeding.
Step 10: Enclose and Deploy
Place the assembled mechanism inside a sturdy enclosure. The oneisall Dual Cat Feeder demonstrates a design that accommodates two bowls with a 5‑L capacity, priced at $42.49 and rated 4.6‑stars. Use the same dimensions to create separate feeding stations for multiple pets, or install a single bowl with a removable tray for easy cleaning.
Tips & Pro Tips
- Use food‑grade stainless steel bowls to avoid metal‑acne in cats, as recommended by several commercial models.
- Seal the hopper with a desiccant packet to keep kibble crisp; the PETLIBRO models include this feature.
- Schedule meals at irregular intervals to mimic natural hunting patterns and reduce food‑guarding behavior.
- Enable logging of Wi‑Fi signal strength; weak signals can cause missed meals, a problem reported by some users of the PETLIBRO 5L.
- Consider adding a camera module for live video verification, but ensure the microphone can be disabled to respect privacy concerns.
Troubleshooting
| Problem | Possible Cause | Solution |
|---|---|---|
| Feeder does not dispense | Motor driver not receiving GPIO signal | Check wiring, verify GPIO pin numbers, and test motor with a simple script. |
| Portion size too large | Incorrect step count | Re‑calibrate steps per rotation; adjust software constant. |
| Wi‑Fi disconnects | Weak router signal | Place Pi closer to router or add a Wi‑Fi extender; use a dual‑band dongle. |
| Food jam detected | Obstruction at outlet | Inspect hopper, clean auger, and ensure sensor alignment. |
Conclusion
By following this guide, one has built a fully functional, Wi‑Fi‑enabled pet feeder that rivals commercial products while offering complete control over hardware and software. The project delivers reliable scheduling, voice calls, safety sensors, and battery backup, all at a fraction of the cost of premium feeders. Continued experimentation—such as adding AI‑driven portion adjustments—can further enhance the system, turning a simple feeder into a smart pet‑care hub.
Products Mentioned in This Guide
Frequently Asked Questions
What hardware components are required to build a Raspberry Pi smart pet feeder?
You need a Raspberry Pi 4, micro‑SD card, 5 V stepper motor or servo, food‑grade hopper, limit switch or IR sensor, Wi‑Fi dongle (if needed), jumper wires, and optional enclosure.
How does Wi‑Fi scheduling work with the DIY feeder?
The Pi runs open‑source software that connects to your home network, allowing you to set feeding times via a web or mobile app that sends commands to the motor.
Can I monitor the feeder remotely?
Yes, the installed software provides remote status updates and can send notifications or voice calls if a jam or low‑food condition is detected.
What is the purpose of the limit switch or infrared sensor?
It detects when food is blocked or the hopper is empty, preventing motor overload and alerting you to refill or clear jams.
Is it safe to use a 3D‑printed enclosure for the feeder?
A food‑grade, non‑flammable enclosure is recommended; ensure ventilation for the Pi and protect wiring from pet interference.